Bria Solo App
The Bria Solo App is the latest SIP App chosen by Cabertel for both desktop and mobile users so customers can take their business phone system with them when they leave the office.

What is Bria Solo?
Bria Solo is an award winning SIP App designed and supported by Counterpath in Vancouver, Canada. It runs on iPhone and Android devices, including tablets, and is also available for PCs running Windows and MACs. It is the follow-on product from the highly successful Bria Mobile App, now in legacy mode. The main advantage of Bria Solo over Bria Mobile is that it supports seamless synchronization from Counterpath's cloud portal. Simply configure your SIP credentials in their cloud portal once and it will synchronize with your installed end point Apps, so only one place to enter your credentials. Now you can set it up once in the cloud and have it configure, as an example, your Windows Bria solo endpoint and iOS Bria Solo endpoint with minimal work. Simply install the Solo App, enter your Bria Solo credentials and it will do the rest.
Why use it?
The main benefit with the Bria Solo App is the ability to make and receive calls when you are away from your desk and without the need for an IP desk phone. When you make a call from your personal cell phone it shows your personal caller ID. However when you call from the Bria Solo App all outbound calls will show your business caller ID rather than your personal number so it protects your personal number and enables you to make business calls from anywhere and at any time.
The Bria Solo App also supports Push service and it is enabled by default. This will save battery life for mobile devices and reduce the chance of missed calls. Follow the Push instructions below to ensure optimal settings.
How much does it Cost?
Bria Solo App has multiple options available. The free version is bare bones but has been tested with Cabertel's PBX service and works great. There is also a subscription version which adds additional features such as the ability to have up to 5 accounts and 3 devices and the ability to record calls, transfer calls and much more. It is free to download but costs $2.95/month for the subscription version. A free 30-day trial is supported so you can test the App before committing to the subscription. Note that this is paid directly to Counterpath via iTunes or the Google Play store. Cabertel does not receive any money from your subscription.
Bria Solo Cloud Account
To get started you must first create a Solo cloud account. Once you create your login you can configure your SIP credentials in your cloud portal.
Ask your Cabertel Account Manager for your SIP credentials
Downloading the App
Once you have your Solo cloud account you will be able to download the App to your device, whether it be a PC, Mac or mobile iOS or Android device. Once you have the App installed simply login to the App using your cloud portal details and it will synchronize your settings.
Your App should connect to your Cabertel service, so long as you have an Internet connection via cell coverage or Wi-Fi, and an account setup with Cabertel. Once connected, the Account should indicate that it is Registered.
One of the most commons reason for it not to register is an incorrectly entered password. Double check the password and note any special characters and capital letters.
Recommended Additional Steps
To ensure optimal service there are a few settings in the Bria Solo App we recommend you adjust.
Auto Start
Auto Start ensures that when a phone or tablet is turned off and then back on again the Bria Solo App will start automatically.
Auto Start for Android
Enable the Auto start on boot option for Android Smartphones as follows:
- Navigate to the Settings page by clicking on the gear wheel bottom right.
- Click on the Preferences menu.
- Click on the check box next to Auto start on boot
Auto Start for iOS
There is no such setting for the iOS version. If you are using Push notifications (which is recommended - see next section), this is all taken care of for you.
PUSH Notifications
The Solo App supports Push notifications by default. Recent iOS and Android updates have made it very difficult for SIP apps such as Bria to remain active in the background and receive incoming phone calls. Bria used techniques to keep it running but the downside was there were still corner cases and battery life was affected significantly. Using a Push server allows the Bria App to be woken up on a need-be basis. It actually acts in a similar manner to the way Facebook notifications are pushed to your phone. If you have older Bria settings we recommend enabling PUSH as it is really good both in terms of reliability for incoming calls and battery life. Ensure your settings match the following sections.
Configure Bria Push for iOS Devices
To properly configure Bria Push notifications for iOS devices, perform the following steps:
- Disable your Cabertel account (see Figure 1). i.e. switch Enabled to left so not orange.
- Use Push Notifications, as shown in Figure 1. When you turn it on, a pop-up may appear asking for your permission to turn PUSH ON. Select YES.
- Set Single Device Emulation for the registration mode.
- Make sure NAT Emulation is disabled.
- Enable your Cabertel account as shown in Figure 1 and you are now using Push service.
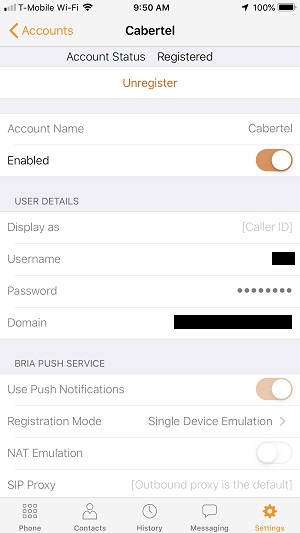
Figure 1: Configure Push Service (iOS)
Configure Bria Push for Android Devices
To properly configure Bria Push notifications for Android devices, perform the following steps:
- Disable your Cabertel account under the Accounts list i.e. slide switch to left so not green.
- Select Use Push Notifications, by checking the box as shown in Figure 2.
- Set the Push registration mode to Single Device Emulation (Figure 2).
- Make sure NAT Emulation is disabled i.e. NOT checked (Figure 2).
- Touch the check mark to save your new settings as per Figure 2.
- Enable your Cabertel account again using the slide switch. You are now using the Push service.
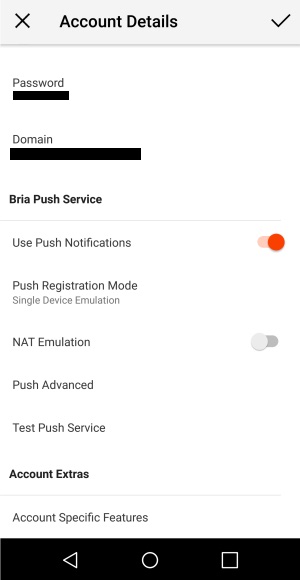
Figure 2: Configure Push Service (Android)
Using the Bria App
Now that you have your account setup and registered with your Cabertel service, it's time to use some of the features in the application.
NOTE: Not all of these features are available in the FREE version of the Bria Solo App.
Extension Dialing
Navigate to the App dialpad by clicking on the phone icon in the bottom left corner. Then simply dial the 3 or 4 digit extension of a colleague followed by the green phone button on the keypad to connect with them, regardless of whether they are in the same office or a different city.
External Dialing
Simply use the App dialpad to dial the 10-digit number you wish to call (with or without a preceding 1) within the USA or Canada, followed by the green phone button.
Putting a Call On-Hold
During an active call you can press the Hold icon on the phone (two vertical lines like a pause symbol as shown in Figure 3) to place the call on hold. When on hold the callee will hear music. Click the same icon to resume the call.
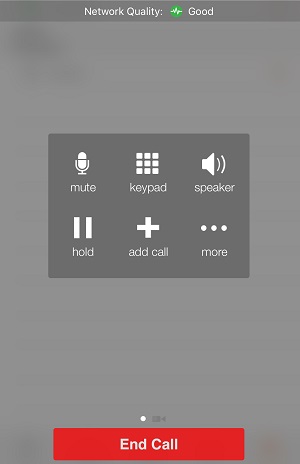
Figure 3: Bria In Call Features
Swapping Between Two Calls
With one call on hold you can initiate a second call (internal or external call) by touching the + icon and dialing the second number (see Figure 6). You can use the Swap key (green button with two opposing arrows) to switch between the two calls in progress (this icon will only show when two calls are in progress). Your App can handle up to two calls at any one time.
Merging (Conference) and Splitting Two Calls
With two calls in progress (as per above) touch on the Merge key (two lines into one icon) and this merges the two calls in progress into a 3 way call with your App. Touch the Split key (one line splitting into two lines icon) to split the 3 way call back into two separate calls. Note that you can use the Hold key to put the 3 way call into hold. Resume the 3 way call using the same key.
Transferring a Call (Blind Transfer)
During an active call you can use the More icon (three periods in a row as shown in Figure 3) to access the Transfer option. Tap on Transfer and the dialer pad will appear. Dial the number you want to transfer the call to and press the green Transfer key to complete the process.
Transferring a Call (Attended Transfer)
During an active call you can tap on the + key, which will put the existing call on hold and the dialer pad will appear (see Figure 6). Dial the number you want to transfer the call to. You will be able to speak to the person you are transferring to. If they want to accept the transfer you can hit the More key (three periods in a row) and then tap on Transfer to complete.
Native Calls
If you are on a native call (meaning your normal cell phone service) then any incoming calls to your App will be directed to Voicemail. The caller will also be directed to Voicemail if you have two calls in progress using your App. If you are on a call using the App you can accept/reject an incoming native call in the usual way that your phone deals with these. Answering a native call will put a current call through the App on hold.
Voicemail
Touch the Voicemail key on your App dialer followed by the green phone key and follow the voice prompts.
Contact Us
If you have questions on the Bria Solo App contact your account manager directly or use the form below and we will respond as soon as possible.
Contact Information:
Address: 16625 Redmond Way Ste. M384, Redmond, WA 98052, United States
Phone: (425) 984-5888
Working Days/Hours: Mon - Fri/ 8:00 AM - 6:00 PM PST
Share:
© 2026 Cabertel. All rights reserved.