VoIP Setup Guide
This VoIP setup guide is intended mainly for new Cabertel customers, but has some sections that are general in nature and may be useful for all readers interested in VoIP. We introduce some VoIP basics for those that are interested, along with some general VoIP set up advice. There is also a section on setting up your new VoIP phone equipment, call handling basics such as hold and transfer, and some instructions for features like accessing voicemail and call forwarding.
If you are a returning customer looking to access specific information use the quick access navigation links below:
- VoIP Basics: Background information including how VoIP works and useful network set up information.
- IP Desk Phone Set Up.
- IP DECT Cordless Phone Set Up and Handset Registration.
- ATA (Analog Telephone Adapter) Set Up.
- Call Handling: Includes dialing, hold, transfer, and call park instructions.
- Basic Features: Includes voicemail, auto-attendant, and basic call feature instructions.
- IP Phone LED Alerts (Yealink).
VoIP Basics
For background purposes we will first touch on the VoIP basics as knowing this may help your understanding for subsequent sections of this setup guide.
How VoIP Works
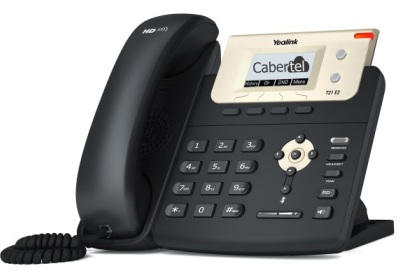
VoIP works by sending audio conversations to and from your phone using your Internet connection instead of a landline. For this reason you need an IP phone, which handles all of the analog to digital conversion that is needed in order to send your audio (voice) as digital packets that travel across the Internet. Note that an analog phone can be used instead of an IP phone but only if an Analog Telephone Adapter (ATA) is utilized.
The benefits of using IP phones are as follows:
- Pre-configured with the correct VoIP settings so they securely connect with our servers.
- Apply power, connect to your Internet service and you are ready to make and receive calls.
- Portable: so long as you have power and Internet you can install your IP phones anywhere.
- Clear Audio: digital techniques in hardware and software can be utilized to ensure high quality audio (e.g. echo cancellation, jitter buffers etc).
Useful VoIP Setup Information
Before setting up your new VoIP service we always recommend that you read our VoIP requirements document. Doing this can save you some time in the long run as it ensures your local network and Internet is VoIP ready.
Setting up your business VoIP system is as simple as connecting your phones to a router (and/or switch), which connects to a modem from your Internet provider. Follow the instructions in the requirements document regarding your router settings as it can cause problems for VoIP if not handled correctly. For example, double NAT configurations (i.e. multiple routers) and SIP ALG being enabled can cause issues such as one-way audio and dropped calls.
The VoIP diagram below shows a simple but effective setup for small businesses.
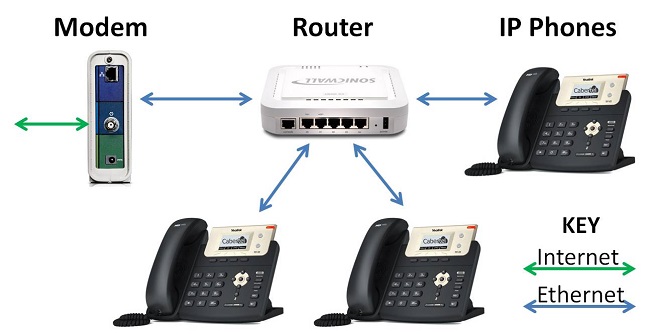
A money saving tip is to buy your own Internet modem instead of renting one from your Internet provider. For example, the Arris SB6141 SurfBoard cable modem is under $50 on Amazon. The rental fee is often as high as $15/month so after 3 or 4 months it pays for itself.
A simple low-cost Ethernet switch (under $20) can be placed between the phones and the router if you need additional Ethernet ports. If your IP phone has a built-in Ethernet switch, take advantage of it. For example you could connect from your router to your IP phone (connector labeled "Internet" on the phone) and then connect a PC or laptop to the switch inside the phone (connector labeled "PC", typically). Refer to Figure 1 below for an example.
VoIP Equipment Set Up
The IP phones and Analog Telephone Adapters (ATAs) provided through Cabertel are pre-configured before they are shipped to our customers. For this reason, if your VoIP setup is correct, when you power your phones up they should connect and register with our servers automatically. All you need to do is plug them in, making self installation very straightforward and quick.
Connecting your VoIP equipment generally only requires two cables to be connected, an Ethernet cable and the power supply cord. These are both provided inside the box that gets delivered to you.
IP Desk Phone Set Up
We recommend following the section labeled "Assembling the Phone" in the Quick Start guide that comes inside the box of the phones you receive from Cabertel. The Quick Start guide will have details specific to your phone make and model and how to assemble it correctly. PLEASE make sure to keep all packaging in "like new" condition in case you need to return the phone for any reason.
Once you have decided on where your phones are going to be installed there are three simple steps to get started using your phones. Repeat the following steps for each phone you have. Typical time needed to set up a phone is 3-5 minutes (including unpacking and connections).
- Unpack and assembly: Unpack the phone from its box and assemble it. Desk phones typically have a stand that needs to be clicked into place and a cord to connect the handset to the phone body.
- Connect the Ethernet cable: Plug the provided Ethernet cable between the IP phone "Internet" labeled port and one of your router/switch spare Ethernet ports. Refer to Figure 1 below for an example.
- Connect the power supply: Plug the provided power supply into the IP phone and then into an appropriate power socket. Refer to Figure 1 below for an example.
The phone will power up and automatically connect with our secure system over the Internet. The first time you plug the phones in they will most likely take a few minutes to configure and they may power cycle a few times. This configuration process should typically take less than 5 minutes to complete.
NOTE: During initial configuration the phone may need to do a firmware update. It is important that the phone is NOT power cycled during a firmware update.
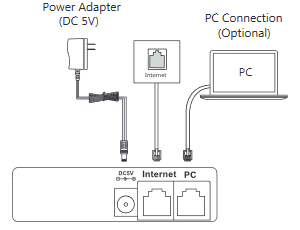
Figure 1: Main Phone Connections
Once a desk phone is configured correctly it will display a telephone icon (like this: ☎) with a name or an extension number next to it. Desk phones will also have a blinking red light while they configure. Once you see the telephone icon and no more flashing red light (on desk phones) the phone is ready to use. And that's it! You are now ready to make phone calls.
Here are a few additional useful notes and tips to be aware of regarding phone set up:
- Some desk phones can be mounted on a wall as well as on a desk. Refer to the Quick Start guide included in the box for instructions on wall mounting. Some phones may require an extra mounting plate.
- Some phones will have a connector for the handset cord as well as a connector for a headset cord. Please make sure you connect to the handset port otherwise you will not get any audio when you try and make a phone call.
- Most phones work with IEEE 802.3af compliant Power over Ethernet (PoE) switches/hubs. If you plan to use these ports in your network you will not need a power supply.
- Most desk phones include an internal Ethernet switch. This means that the phone can be placed inline between your router/switch Ethernet port and your PC, reducing the need for multiple Ethernet ports and cables. Refer to Figure 1 above for an example.
- As noted above please do not power cycle a phone during a firmware update.
If you have any problems connecting your new phones or are unsure then contact your account manager directly for support. We are happy to help.
IP DECT Cordless Phone Set Up and Handset Registration
The first thing to set up is the DECT base station, followed by the cordless handset(s). As with the desk phones we recommend looking through the "Assembling the DECT Phone" section in the Quick Start guide included in the box.
Unpack the base station then follow these three steps to set it up. PLEASE make sure to keep all packaging in "like new" condition in case you need to return the phone for any reason.
- Connect the Ethernet cable: Plug the provided Ethernet cable between the DECT base "Internet" labeled port and one of your router/switch spare Ethernet ports. Refer to Figure 2 below for an example.
- Connect the power supply: Plug the provided power supply into the DECT base and then into an appropriate power socket. Refer to Figure 2 below for an example.
- Assembly: Click the stand into place on the base station for a desktop installation.
The DECT base station will power up and automatically connect to our secure servers. Initial configuration can take up to 5 minutes as the base may run through a firmware update. Once the base station is fully configured you will see two green lit LEDs, one for power and one for Internet connectivity.
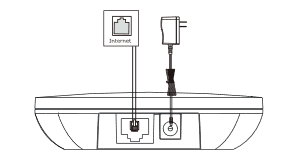
Figure 2: Main Base Station Connections
Cordless Handset Registration
Next you will need to register the cordless handset(s) to the base station you have connected successfully above. First, install the battery into the handset, attach the belt clip (optional), and plug the power cord into the handset cradle. You may need to charge the handset in its cradle before registration if the battery has no charge.
Follow these simple steps to register each of your handsets, one at a time:
- When the handset LCD screen prompts "Unregistered!", long press (approx. 3-4 seconds) the wireless button on the base station until the phone LED indicator on the base starts to flash.
- Press the "Reg" soft key on the handset to register it to the base. The handset should update with the next extension number. It may ask for a PIN code, the default is 0000. It may also update the software on the handset at this time.
- Repeats steps 1 and 2 for each handset that you have. The Yealink W60B base station can accomodate up to 8 cordless handset registrations.
Once your cordless handsets are successfully registered they are now ready to use. The display should show "bars" (up to 5) in the top left relating to the signal strength from the base. The display should also indicate the correct time and date and show a handset number.
To make a call you can enter the desired number to call and press the green telephone icon button or the OK button to dial the number. To answer a call you can simply lift the handset from the cradle, press the OK button or the green telephone icon button. To end a call you press the red telephone icon button.
If you need help or are unsure please contact your account manager directly for help.
ATA (Analog Telephone Adapter) Set Up
If you plan to utilize your existing analog phone set up (e.g. cordless phone systems you can still buy in stores like Costco and Best Buy) then we can supply you with an ATA device which provides the interface between your analog phone system and your router.
Similar to IP phones there are three simple steps for getting started. There is no assembly required for the ATA so you simply just unpack the box, which includes the ATA, an Ethernet cable, and a power supply. Refer to Figure 3 below for a view of the connectors on the back of the ATA device.
- Connect the Ethernet cable: Plug the provided Ethernet cable between the ATA blue colored Internet port and one of your router/switch spare Ethernet ports.
- Connect the telephone cable: Plug your standard RJ11 telephone cable between the ATA green colored phone port and your analog telephone.
- Connect the power supply: Plug the provided power supply into the ATA power port and then into an appropriate power socket.
Once all connections are made the ATA will power up, connect to our secure system over the Internet, and configure itself. This may take a few minutes. Once the ATA is fully configured the three power, Internet, and phone lights on the top of the ATA will be lit.
NOTE: It is very important that the ATA is NOT power cycled during the initial configuration as it may be performing a firmware update.

Figure 3: Main ATA Connections
The ATA uses the power, Internet and phone lights on top of the device to indicate its status as it has no display. Here are some useful states to be aware of for each of the three lights:
- The power light will be off if no power is applied, on when power is applied and flashing when the ATA is configuring itself.
- The Internet light will be off when no Internet is present, on when the ATA has a valid Internet connection, and flashing during data transfer to/from the Internet.
- The phone light will be off if no phone is connected and on when a phone is connected and registered to our system.
- The phone light will also blink every second to show off-hook or busy, or blink slowly to indicate a voicemail has been received.
If you have any questions related to connecting your new ATA or are unsure then contact your account manager directly for support. We are happy to help.
Call Handling
Assuming your IP phones registered with our servers successfully, you should now be able to make phone calls. You will also be able to receive calls if you purchased new phone numbers or your existing numbers have ported over to Cabertel successfully.
Extension Dialing
Simply dial the 3 or 4 digit extension of a colleague to connect with them, regardless of whether they are in the same office or a different city.
External Dialing
Simply dial the 10-digit number you wish to call (with or without a preceding 1) within the USA or Canada. If you would like to have International dialing ability then contact your account manager.
Putting a Call on Hold
During an active call you can press the Hold softkey on the phone to place the call on hold. When on hold the callee will hear music. Click the Resume softkey to take the call off of hold. More details on placing calls on hold here.
If you are using the DECT cordless handsets there will be an "Options" softkey (bottom right of display) available during an active call. If you press this a menu will display with options for hold, transfer, and 3-way conference calls. Navigate to the hold option and press the OK button. The call will now be on hold. Press the "Resume" softkey (bottom left of display) to resume your call.
Transferring a Call
During an active call you can use the Tran softkey (sometimes labeled transfer) or TRAN button on the IP phone to transfer a call to another extension in your phone system or to an external number. This can be used for attended and blind transfers as defined below:
As noted above you can access the "Transfer" option on a DECT handset through the "Options" softkey.
Blind Transfer
For a blind transfer, you simply hang up when you hear the ring tone for the phone you are transferring a call to, and therefore the steps are as follows:
- While on a call that you wish to transfer, press the tran softkey or TRAN button.
- Enter the number for the extension or external number.
- Once you hear it ringing, hang up the call or press the tran softkey or TRAN button.
Attended Transfer
For an attended transfer you wait until the person you wish to transfer the call to answers your call and once you inform them of the transfer you can then hang up, as detailed below:
- While on a call that you wish to transfer, press the tran softkey or TRAN button.
- Enter the number for the extension or external number.
- Wait for the call to be answered and inform the person you are transferring a call to them.
- Hang up the call or press the tran softkey or TRAN button.
As a side note, pressing cancel during the transfer will cancel it and you can resume your call.
3-way Calling
During an active call you can also conference in a third party to join your conversation. For customers that use IP desk phones adding a third party to your call is relatively straight forward as there is a specific button assigned for this feature. This button only shows up when you are in an active call. So whether you initiated a call or someone called you, as long as you are on an active call you can use the button to have a third party join your conversation.
Here are the instructions for using this feature to add a third party to your active call:
- Across the bottom of the display will be 4 buttons. The second in from the right side will say "Conf", or "Conferen", or "Conference", depending on display size (ONLY during an active call). Press this button.
- The other party will be put on hold and will hear on hold music. Dial the third party number and press "Send/Call" (first button on left below display).
- Once the third party has answered you can then press "Conf" again to join all three parties into the conversation.
Once you have completed the call you can hang up to end your call. If the third party hangs up or ends their call you will still be in an active call with the original caller/callee. This makes it useful for bringing in a third party for questions and then letting them leave the conversation so you can continue with the original call. However, if you initiated the 3-way call and you hang up or end the call then the call for everyone will end.
Park a Call
Call parking is very useful if you wish to place a call on hold and pick it back up on a different phone. To park a call it is more efficient to use a Park key on the phone. If you do not have this ask your account manager to add it to your phone. A call can be parked as follows:
- When you are on a call press the Park key.
- Go to your other phone and press the Park key to pick up the call.
- This will bridge the original call to the new phone.
Basic Features
In this section we will detail some of the basic VoIP features with the Cabertel business phone service, so you can get up and running quickly. For a complete list visit our service features page.
Setup a Voicemail Greeting
Dial *97, or hit the Message key on your IP phone and follow the voice prompts.
Listen to Voicemails
There are multiple ways to listen to your voicemails:
- Play directly from the notification you receive via email.
- Press the Message button on your phone.
- Dial *97 from your phone.
- Play or download using the Cabertel portal (discussed later in this guide).
Auto Attendant Setup
Contact your Account Manager if you would like to use the Auto-Attendant feature and we will help set it up for you.
Web Portal Phone Management Interface
Your account manager will supply you with your login information for portal access. Note that Firefox and Chrome browsers have the best compatibility with our portal. The following basic features can be accessed inside the portal (advanced features can also be enabled):
- Do Not Disturb: Forces all calls to go to voicemail. Can also be turned on and off on your IP phone.
- Call Forwarding: Forwards calls to a different number (internal or external number).
- Follow Me: Forward calls to multiple phone numbers. First one to pick up wins.
- Call Block: Set calls from specific numbers to either be rejected or go to voicemail.
- Voicemail: Listen or download voicemail messages.
IP Phone LED Alerts (Yealink)
Yealink phones have a red power LED on the top right of the device. This LED can provide the following phone status:
- Configuring/Programming: The LED will flash every second during phone configuration. Please wait until the LED stops flashing to use the phone.
- Missed Call: The LED will flash approximately every 2 seconds to indicate a missed call. To remove this condition press view on the soft key to see missed calls. The history soft key may also be used to view missed calls.
- Voicemail: The light will flash every 2 seconds to indicate you have a voicemail (also message button will go green - see below). When you access the voicemail either in your portal or from the phone, the light will stop flashing.
Some Yealink phones have a LED voicemail button which light up green when a voicemail is present for that phone's extension. When you listen to the message either by pressing the Message button or by accessing your Web portal, the green light will turn off.
Your New Phone System
We hope this VoIP setup guide has helped get you up and running quickly with your new business phone service. At Cabertel we pride ourselves on customer service so please take advantage of this and reach out to your account manager should you have any questions at all. We are here to help you and hope you enjoy your new phone service for many years to come.
Contact Us With Any Questions
Contact your account manager if you have any questions. Alternatively call us at 425-984-5888 or use the form below and we will get back to you promptly.
Contact Information:
Address: 16625 Redmond Way Ste. M384, Redmond, WA 98052, United States
Phone: (425) 984-5888
Working Days/Hours: Mon - Fri/ 8:00 AM - 6:00 PM PST
Share:
© 2026 Cabertel. All rights reserved.